Introduction
Managing multiple data warehouses is a common challenge that organizations face today. Two popular choices are Snowflake and BigQuery, each boasting its own strengths and catering to specific needs. However, this multi-warehouse setup can introduce a new challenge: ensuring data consistency between them. This is where the Data Validation Tool (DVT) comes in, acting as a crucial bridge between Snowflake and BigQuery. The tool is not limited to just those two data warehouse systems but can work with a variety of databases.
High-level overview
DVT, by Google, is an open-source Python command-line tool specifically designed for data warehouse, database, or data lake migrations. It automates comparing data between source and target tables to ensure they match after each migration step. DVT supports various data sources like BigQuery and Cloud SQL and works across different environments.
The tool uses the powerful Ibis framework to build portable data frames that are agnostic to backend frameworks.
What is DVT and why is it important for Snowflake-BigQuery integration?
DVT is a data quality practice that involves comparing data across different sources to identify and rectify discrepancies. In the context of Snowflake and BigQuery, DVT helps ensure that the data being replicated or migrated between the two platforms is accurate and complete. This is critical for several reasons:
- Improved decision-making: Inconsistent data can lead to misleading insights and inaccurate reports, hindering effective decision-making.
- Enhanced trust in data: DVT builds trust in the data’s integrity, allowing stakeholders to confidently rely on it for analysis and reporting.
- Reduced business risks: Data inconsistencies can lead to operational issues and financial losses. DVT helps mitigate these risks by proactively identifying and resolving data quality problems.
How can DVT be implemented for Snowflake-BigQuery validation?
There are several approaches to DVT for Snowflake-BigQuery integration. Here are some popular methods:
- Direct table comparisons: This involves querying corresponding tables in both Snowflake and BigQuery and comparing the results row-by-row. While straightforward, this method can be inefficient for large datasets.
- Data profiling: Profiling tools can be used to analyze the statistical properties of data in both platforms, such as column distributions and null values. This can help identify potential discrepancies before performing detailed comparisons.
- Schema validations: Schema validations help ensure that the structure of your data in a source system matches the structure in a target system. It compares column names and data types, ignoring case sensitivity.
- Custom query row validations: This approach allows you to compare the individual rows of data between a source and target system, even when working with custom queries instead of entire tables.
- Ad hoc SQL exploration queries directly within the validation process: This saves you time and keeps your workflow streamlined.
Code examples can be found on the GitHub repository.
DVT in action: a retail data warehouse migration
Now that we’ve laid out what DVT is and why it’s important for Snowflake-BigQuery integration, let’s dive into a real-world use case. SADA recently helped an enterprise retail customer build a parallel data warehouse in BigQuery. This project aimed to:
- Build a more robust data warehouse with improved data management capabilities.
- Build a more insightful data warehouse providing accurate and timely business insights.
- Decommission an existing Snowflake-based data warehouse.
Challenge: ensuring data consistency during a complex migration
In this project, we aimed to replace the data warehouse built in Snowflake with the new and improved data warehouse built in BigQuery. The data warehouse in Snowflake has been used for a number of years and is well-trusted by its consumers.
We needed the ability to prove that data is consistent between those two systems in cases when no improvements were made during the development process. Moreover, we needed to determine if the logical data transformations and data aliasing could still be validated using DVT in cases where enhancements over the data model in Snowflake were needed and implemented in the ETL pipelines feeding data into BigQuery.
The data loading patterns into Snowflake didn’t match that of BigQuery, therefore data was not expected to be identical at all times. Both systems needed to be in consistent alignment within a small margin of error.
DVT played a central role in our User Acceptance Testing in allowing us to get the assurance that data matches between those two systems and if there were valid acceptable reasons when it didn’t. Moreover, the cross-data warehouse validation testing enabled us to uncover, prioritize, and resolve a number of defects that were not previously discovered.
Key considerations for data validation tool selection
Now, let’s discuss some of the key pillars we focused on to identify the right tool for the job.
Incremental testing
Incremental testing, within the context of ETL processes, is a strategy where testing is conducted in small, manageable segments during the development of data pipelines and production runs to conduct data quality checks. Furthermore, the incremental testing strategy is also applied post-deployment of the pipeline into production as part of the migration process. This allows for the collection of metrics from each incremental job run, providing ongoing insights into data quality and comparison with the source system which we migrated from.
Elimination of manual testing
This automation incorporates incremental testing and automated comparison of data between the Snowflake and BigQuery warehouse systems as part of the migration process, aiming to mitigate any discrepancies between the systems. Furthermore, the incremental strategy must adapt to both known differences and potential improvements during the comparison between the source and target systems. Considering the near-real-time data warehouse refresh every 15 minutes, it’s imperative to develop a scalable method for running these comparisons without relying heavily on manual intervention.
Easy identification of discrepancies
As part of this incremental testing, ongoing tests are essential to compare new outputs produced in both the source and target systems. It is crucial to establish a reliable method for identifying differences at the table level, and column level, and for metrics related to data within these entities, such as the number of nulls, the number of non-null values, and the total number of rows. Moreover, there should be a capability to generate these metrics in a way that allows for direct comparison, producing outputs in the same format across both systems (apples-to-apples comparisons). With all these guards in place, we need the right way to identify error cases post-identification of discrepancies.
Tracking data quality metrics over time
DVT helps you ensure data quality and reliability by scanning for issues it identifies inconsistencies, anomalies, and errors to pinpoint problems. Moreover, it tracks trends and changes over time, helping you spot areas needing improvement in terms of data quality. Besides that it could be integrated with alerting capabilities to be notified when quality metrics fall outside defined thresholds, allowing for quick action. Additionally, it enhances collaboration and shares reports with stakeholders for a shared understanding and data-driven decisions by storing its results in a database for easy access. We stored the DVT test results in BigQuery to be able to demonstrate the history of defects and to analyze the results further for reporting purposes.
Continuous integration and deployment
Google DVT isn’t directly used for Continuous Integration and Deployment (CI/CD) itself, as its focus lies on data validation. However, it can be a valuable asset within a CI/CD pipeline for ensuring data health and integrity throughout the deployment process. That can be achieved by integrating DVT checks into your CI pipeline to automatically validate data after code changes, deployments, or data migrations, catching issues early and preventing them from reaching production. Moreover, continuous data validation with DVT increases confidence in deployments by ensuring data consistency and quality across environments. Lastly, with automated DVT reports, pinpointing data-related issues during deployments becomes significantly faster, minimizing downtime and rollback complexities. GitHub Actions was used to create an environment and execute the DVT tests based on triggering or through manual execution.
How data discrepancies between Snowflake and BigQuery were addressed
While the DVT tool strives for bit-for-bit data accuracy, acknowledging inherent platform differences between Snowflake and BigQuery was crucial. Here’s how we tackled some key discrepancies:
- Threshold percentage tolerances:
- Instead of strict equality checks, we implemented configurable threshold tolerances for specific data types. These thresholds accounted for known discrepancies, like timestamp rounding variations, without compromising data integrity.
- For example, a marginal tolerance on floating-point comparisons allowed for minor rounding differences while flagging significant deviations.
2. Rounding discrepancies:
- We identified known rounding issues between BigQuery and Snowflake decimal data types. To address this, we employed custom data transformation functions during comparison.
- These functions normalized data representation before comparison, ensuring consistent interpretation regardless of origin platform. For instance, rounding both values to a specific decimal place before comparison eliminated minor rounding discrepancies.
3. Intuitive discrepancy identification:
- We went beyond just flagging discrepancies. The DVT tool generated detailed reports highlighting which specific data points exceeded the configured thresholds.
- This granular insight helped pinpoint the exact areas of divergence, enabling deeper investigation and targeted remediation efforts.
These measures ensured efficient and accurate data comparison across Snowflake and BigQuery, striking a balance between strict data validation and acknowledging platform peculiarities.
Sample validations can be found on the GitHub repository.
Additional details are provided in the sections below:
Deployment environments
The setup included three main deployment environments, development, staging, and production. DVT was configured to be connected to each of those environments. The same test cases could be executed against any of those environments through a simple configuration setup.
User Acceptance Testing was performed in a separate staging GCP project. The data in the staging environment was compared to the corresponding data in Snowflake using DVT. When data inconsistencies were discovered, the defects would be fixed in the lower development environment.
Establishing data warehouse connections
Before running validations, DVT requires a source and target connection to be set up. These connections can be stored locally or in a Google Cloud Storage (GCS) bucket. Using a GCS bucket is recommended for storing these connections as it allows you to limit access to these connections as credentials are stored in plain text.
To set up a connection between the source and target data warehouses, the DVT binary (google-pso-data-validator) needs to be installed on the platform it will be executed from. For this, you will need to have Python 3.8 or above installed.
Validation results can be printed to stdout by default or outputted to a BigQuery table (recommended). We chose to use a BigQuery results table, which was created as part of our initial setup.
Additionally, we chose to automate our DVT validations using a CI/CD pipeline. These were short-lived runs executed as GitHub Actions pipelines triggered by our data management workflows. More on this later.
Creating data validation connections
DVT allows users to create connections using the CLI. These connections will automatically be saved either to ~/.config/google-pso-data-validator/ or a directory specified by the environment variable PSO_DV_CONFIG_HOME.
To store the connections in a GCS bucket, we add the GCS directory path to the PSO_DV_CONFIG_HOME environment variable. The following is a sample:
export PSO_DV_CONFIG_HOME=gs://my-bucket/my/connections/path/
Note that if this path is set, query validation configs will also be saved here.
Source connection
Snowflake is our source data warehouse, but DVT supports the other data warehouses as seen here.
Note that DVT supports Google Cloud Secret Manager for storing and referencing secrets in your connection configuration.
The following sample CLI command shows you how to create a Snowflake connection:
data-validation connections add
 - secret-manager-type GCP
 - secret-manager-project-id GCP_SECRET_PROJECT_ID
 - connection-name SNOWFLAKE_CONN_NAME
 - user SNOWFLAKE_USER
 - password SNOWFLAKE_PASSWORD
 - account SNOWFLAKE_ACCOUNT
 - database SNOWFLAKE_DATABASE/SCHEMA
 - connect-args CONNECT_ARGS
Creating a target connection
BigQuery is our target data warehouse so a target connection is also needed for BigQuery.
Note that the User/Service account needs the following BigQuery permissions to run DVT:
- bigquery.jobs.create (BigQuery JobUser role)
- bigquery.readsessions.create (BigQuery Read Session User)
- bigquery.tables.get (BigQuery Data Viewer)
- bigquery.tables.getData (BigQuery Data Viewer)
And the following permissions when storing validation results in BigQuery:
- bigquery.tables.update (BigQuery Data Editor)
- bigquery.tables.updateData (BigQuery Data Editor)
The following sample CLI command shows you how to create a BigQuery connection:
data-validation connections add
 - secret-manager-type GCP
 - secret-manager-project-id GCP_SECRET_PROJECT_ID
 - connection-name BIGQUERY_CONN_NAME
 - project-id GCP_PROJECT
 - google-service-account-key-path PATH_TO_SA_KEY
Star schema validation
Fact table validation
The fact table was validated by aggregating data over several months to compare key metrics across the two data warehouse systems. A combination of row and column-based comparisons were used for validation depending on the conditions for each of the columns. Some of the columns could be easily compared across the systems, in which case row-based comparisons were used. In other cases, some columns were expected to deviate due to how each of the data warehouses performed numerical rounding, in which case a column-based comparison with a margin of error was used.
The fact tables’ DVT tests were written as YAML files to describe the source, target, transformation, and comparison criteria. Here is a sample of the row-based tests which were used.
(Note that in the below sample, source refers to the data warehouse in Snowflake while the target refers to data warehouse in BigQuery.)
result_handler:
 project_id: [GCP PROJECT ID]
 table_id: dvt_data_validator.results
 type: BigQuery
# reference to the Snowflake Source System Connection
source: sf
# reference to the BigQuery Source System Connection
target: bq
validations:
 # this is the list of aggregations which will be applied to each of the comparison fields
- aggregates:
 # Local currency columns
 - field_alias: sum_gross_sales_loc
   source_column: GROSSSALESLOC
   target_column: GROSSSALESLOC
   type: sum
 - field_alias: sum_net_sales_loc
   source_column: NETSALESLOC
   target_column: NETSALESLOC
   type: sum
 - field_alias: sum_tax_loc
   source_column: TAXLOC
   target_column: TAXLOC
   type: sum
 - field_alias: sum_cost_loc
   source_column: COSTLOC
   target_column: COSTLOC
   type: sum


 # GBP currency columns
 - field_alias: sum_tax_g
   source_column: TAXG
   target_column: TAXG
   type: sum
 - field_alias: sum_gross_sales_g
   source_column: GROSSSALESG
   target_column: GROSSSALESG
   type: sum
 - field_alias: sum_net_sales_g
   source_column: NETSALESG
   target_column: NETSALESG
   type: sum
 - field_alias: sum_cost_g
   source_column: COSTG
   target_column: COSTG
   type: sum


   # Sales Quantity
 - field_alias: sum_sales_qty
   source_column: SALESQUANT
   target_column: SALESQUANT
   type: sum


 # this describes the transformations which is done to rollup the transaction data time to the year and month granularity
 calculated_fields:
 - depth: 0
   field_alias: transaction_t
   source_calculated_columns:
   - END_DATETIME
   target_calculated_columns:
   - transaction_date_time
   type: custom
   ibis_expr: ibis.expr.types.TemporalValue.strftime
   params:
   - format_str: '%Y-%m'
 # filter the rows which are retrieved from the source and target systesm. Currently filtering on the past three month
 # excluding current month
 filters:
 - source: t1."transaction_t">=to_varchar(ADD_MONTHS(CURRENT_DATE, -3), 'YYYY-MM')
   target: transaction_t>=CAST(DATE_SUB(CURRENT_DATE('UTC'), INTERVAL 3 MONTH) AS STRING FORMAT('YYYY-MM'))
   type: custom
 - source: t1."transaction_t"<to_varchar(CURRENT_DATE, 'YYYY-MM')
   target: transaction_t<cast(CURRENT_DATE('UTC') as string format('YYYY-MM'))
   type: custom
 # group by the transaction time field
 grouped_columns:
 - cast: null
   field_alias: transaction_t
   source_column: transaction_t
   target_column: transaction_t
 # below is the list of column names to be used for comparison from each of the source and target systems
 comparison_fields:


 # Local currency columns
 - cast: null
   field_alias: gross_sales_loc
   source_column: GROSS_SALES_LOC
   target_column: GrossSalesLoc
 - cast: null
   field_alias: net_sales_loc
   source_column: NET_SALES_LOC
   target_column: NetSalesLoc
 - cast: null
   field_alias: tax_loc
   source_column: TAX_LOC
   target_column: TaxLoc
 - cast: null
   field_alias: cost_loc
   source_column: COST_LOC
   target_column: CostLoc


 # GBP currency columns
 - cast: null
   field_alias: tax_g
   source_column: TAX_G
   target_column: TaxG
 - cast: null
   field_alias: gross_sales_g
   source_column: GROSS_SALES_G
   target_column: GrossSalesG
 - cast: null
   field_alias: net_sales_g
   source_column: NET_SALES_G
   target_column: NetSalesG
 - cast: null
   field_alias: cost_g
   source_column: COST_G
   target_column: CostG


 # Sales Quantity
 - cast: null
   field_alias: sales_quantity
   source_column: SALES_QTY
   target_column: SalesQuantity


 # include both failures and successes
 filter_status: null
 format: table
 labels:
   - !!python/tuple
     - domain
     - sales
   - !!python/tuple
     - scope
     - fact_sales
 # the primary key for this table is the transaction time, which is essentially rolled up to the year and month
 primary_keys:
 - cast: null
   field_alias: transaction_t
   source_column: transaction_t
   target_column: transaction_t
 random_row_batch_size: null
 schema_name: FACT
 table_name: SALES
 target_schema_name: BQ_DATASET
 target_table_name: SALES_FACT_TABLE
# apply row-based comparison based on the primary key for each row with zero error margin
 threshold: 0.0
 type: Row
 use_random_rows: false
On the other hand, in cases where we knew that there were numerical rounding differences between Snowflake and BigQuery, we applied column-based comparison with a small margin of error represented as the ‘threshold’ parameter towards the end of the YAML file below:
result_handler:
 project_id: [GCP PROJECT ID]
 table_id: dvt_data_validator.results
 type: BigQuery
# reference to the Snowflake Source System Connection
source: sf
# reference to the BigQuery Source System Connection
target: bq
validations:
  # this is the list of aggregations which will be applied to each of the comparison fields
- aggregates:
 - field_alias: sum_gross_sales_e
   source_column: GROSS_SALES_E
   target_column: GrossSalesE
   type: sum
 - field_alias: sum_net_sales_e
   source_column: NET_SALES_E
   target_column: NetSalesE
   type: sum
 - field_alias: sum_tax_e
   source_column: TAX_E
   target_column: TaxE
   type: sum
 - field_alias: sum_cost_e
   source_column: COST_E
   target_column: CostE
   type: sum
 filter_status: null
 # this describes the transformations which is done to rollup the transaction data time to the year and month granularity
 calculated_fields:
   - depth: 0
     field_alias: transaction_t
     source_calculated_columns:
       - END_DATETIME
     target_calculated_columns:
       - transaction_date_t
     type: custom
     ibis_expr: ibis.expr.types.TemporalValue.strftime
     params:
       - format_str: '%Y-%m'
 # filter the rows which are retrieved from the source and target system. Currently filtering on the past three month
 # excluding current month
 filters:
   - source: t1."transaction_t">=to_varchar(ADD_MONTHS(CURRENT_DATE, -3), 'YYYY-MM')
     target: transaction_t>=CAST(DATE_SUB(CURRENT_DATE('UTC'), INTERVAL 3 MONTH) AS STRING FORMAT('YYYY-MM'))
     type: custom
   - source: t1."transaction_t"<to_varchar(CURRENT_DATE, 'YYYY-MM')
     target: transaction_t<cast(CURRENT_DATE('UTC') as string format('YYYY-MM'))
     type: custom
 # below is the list of column names to be used for comparison from each of the source and target systems
 comparison_fields:
   - cast: null
     field_alias: gross_sales
     source_column: GROSS_SALES_EURO
     target_column: GrossSalesE
   - cast: null
     field_alias: net_sales
     source_column: NET_SALES_E
     target_column: NetSalesE
   - cast: null
     field_alias: tax
     source_column: TAX_E
     target_column: TaxE
   - cast: null
     field_alias: cost
     source_column: COST_E
     target_column: CostE
 # group by the transaction time field
 grouped_columns:
   - cast: null
     field_alias: transaction_t
     source_column: transaction_t
     target_column: transaction_t
 format: table
 labels:
   - !!python/tuple
     - domain
     - sales
   - !!python/tuple
     - scope
     - fact_sales
 random_row_batch_size: null
 schema_name: FACT
 table_name: SALES
 target_schema_name: BQ_DATASET
 target_table_name: SALES_FACT_TABLE
 # below is the threshold that was configured to account for business-acceptable discrepancies
 threshold: 0.00003
 type: Column
 use_random_rows: false
The above validation test YAML files were executed through the following DVT CLI bash commands:
# Fact Sales Validation Tests
# Validate the fact sales local and GBP currency metrics
data-validation configs \
run -c ../validations/sales/fact_sales/fact_sales_table_validations_local_and_gbp_metrics.yaml
# Validate the fact sales euro metrics metrics
data-validation configs \
run -c ../validations/sales/fact_sales/fact_sales_table_validations_euro_metrics.yaml
Dimension tables validation
Dimensions required a distinct validation strategy compared to that of the fact tables. To streamline the process, the team opted for crafting SQL queries tailored to each data warehouse system, eliminating the need for a YAML file in this instance.
Below, we’ll illustrate two use cases: one involving a direct comparison between corresponding dimension tables, and another necessitating transformations for a similarity comparison.
Firstly, let’s examine a straightforward use case involving the Brand Type Dimension table. To extract data from Snowflake compatible with the enhancements implemented in BigQuery, we had to transform the Snowflake data to match the following format:
SELECT
DATE(END_DATETIME) DATEKEY,
case [CASES LISTED HERE] AS BRANDTYPE,
SUM(GROSS_SALES_GBP) GROSSSALES
FROM SALES_FACT_TABLE FS
JOIN PRODUCT_DIMENSION_TABLE AS P
ON FS.PRODUCTKEY=P.PRODUCTKEY
WHERE DATE(END_DATETIME) = DATEADD(DAY, -1, CURRENT_DATE())
GROUP BY DATEKEY,BRANDTYPE
ORDER BY DATEKEY,BRANDTYPE;
In BigQuery, the query looked as follows:
SELECT
DATE(END_DATETIME) DATEKEY,
case [CASES LISTED HERE] AS BRANDTYPE,
SUM(GROSS_SALES_GBP) GROSSSALES
FROM SALES_FACT_TABLE FS
JOIN PRODUCT_DIMENSION_TABLE AS P
ON FS.PRODUCTKEY=P.PRODUCTKEY
WHERE DATE(END_DATETIME) = DATEADD(DAY, -1, CURRENT_DATE())
GROUP BY DATEKEY,BRANDTYPE
ORDER BY DATEKEY,BRANDTYPE;
Note that both queries compare only the previous day of data and not the entirety of data in each of the tables. This has been mainly scoped down to control costs and runtime on both data warehouses.
In order to use the above SQL files, we ran the following DVT CLI bash command:
## Fact Sales and Dim Brand Type Validation for a single day
# dim_brand_type column-by-column comparison
data-validation validate custom-query row \
 - source-query-file ../validations/sales/dim_brand_type/source_query.sql \
 - target-query-file ../validations/sales/dim_brand_type/target_query.sql \
-sc sf \
-tc bq \
 - comparison-fields BRANDTYPE,GROSSSALES \
-pk brandtype \
-bqrh [GCP PROJECT ID].dvt_data_validator.results \
 - filter-status 'fail'
In the command above, we pass in the following parameters:
- The relative paths of each of the SQL files
- The source and target connection names referencing each of the data warehouses
- The comparison fields to be used across the systems
- The primary key of each of the tables which will be used by DVT to join and compare the results
- The BigQuery project, dataset, and table name where DVT will write its test output results to
- The filter status of which results would be written to BigQuery, in this case, its filtered to just the failure cases
On the other hand, a straightforward example is the Product Gender Dimension which matched in logic in each of the data warehouses and only needed some column aliasing to be able to successfully perform the comparison.
In Snowflake, the query looked as follows:
SELECT
DATE(END_DATETIME) DATEKEY,
PRODUCTGENDERAGE AS PRODUCTGENDERAGE,
PRODUCTGENDERGROUP AS PRODUCTGENDERGROUP,
PRODUCTGENDERMWK AS PRODUCTGENDERSECTION,
SUM(GROSS_SALES_GBP) GROSSSALES
FROM SALES_FACT_TABLE fs
JOIN PRODUCT_DIMENSION_TABLE as p
ON fs.productkey=p.productkey
WHERE DATE(end_datetime) = dateadd(day, -1, current_date())
GROUP BY DATEKEY, PRODUCTGENDERAGE, PRODUCTGENDERGROUP, PRODUCTGENDERSECTION
ORDER BY DATEKEY, PRODUCTGENDERAGE, PRODUCTGENDERGROUP, PRODUCTGENDERSECTION;
In BigQuery, the query looked as follows:
SELECT
DATE(TRANSACTIONDATETIME) DATEKEY,
PRODUCTGENDERAGE,
PRODUCTGENDERGROUP,
PRODUCTGENDERSECTION,
SUM(GROSSSALESGBP) GROSSSALES
FROM SALES_FACT_TABLE fs
JOIN PRODUCT_GENDER_DIMENSION_TABLE AS pg
ON fs.productgenderbk = pg.productgenderbk
WHERE DATE(transactiondatetime) = date_sub(current_date(), interval 1 day)
GROUP BY DATEKEY, PRODUCTGENDERAGE, PRODUCTGENDERGROUP, PRODUCTGENDERSECTION
ORDER BY DATEKEY, PRODUCTGENDERAGE, PRODUCTGENDERGROUP, PRODUCTGENDERSECTION;
In order to use the above SQL files, we ran the following DVT CLI bash command:
## Fact Sales and Dim Brand Type Validation for a single day
# dim_product_gender column-by-column comparison
data-validation validate custom-query row \
 - source-query-file ../validations/sales/dim_product_gender/source_query.sql \
 - target-query-file ../validations/sales/dim_product_gender/target_query.sql \
-sc sf \
-tc bq \
 - comparison-fields PRODUCTGENDERAGE,PRODUCTGENDERGROUP,PRODUCTGENDERSECTION,GROSSSALES \
-pk productgenderage \
-bqrh gcp_project_1.dvt_data_validator.results \
 - filter-status 'fail'
CI/CD automation
To automate DVT data validations, we defined a GitHub Actions pipeline that runs each data validation step required per environment. GitHub Actions is a continuous integration and continuous delivery (CI/CD) platform that allows you to automate your build, test, and deployment pipeline.
Below is a diagram depicting the workflow a data engineer would follow when triggering a data validation:
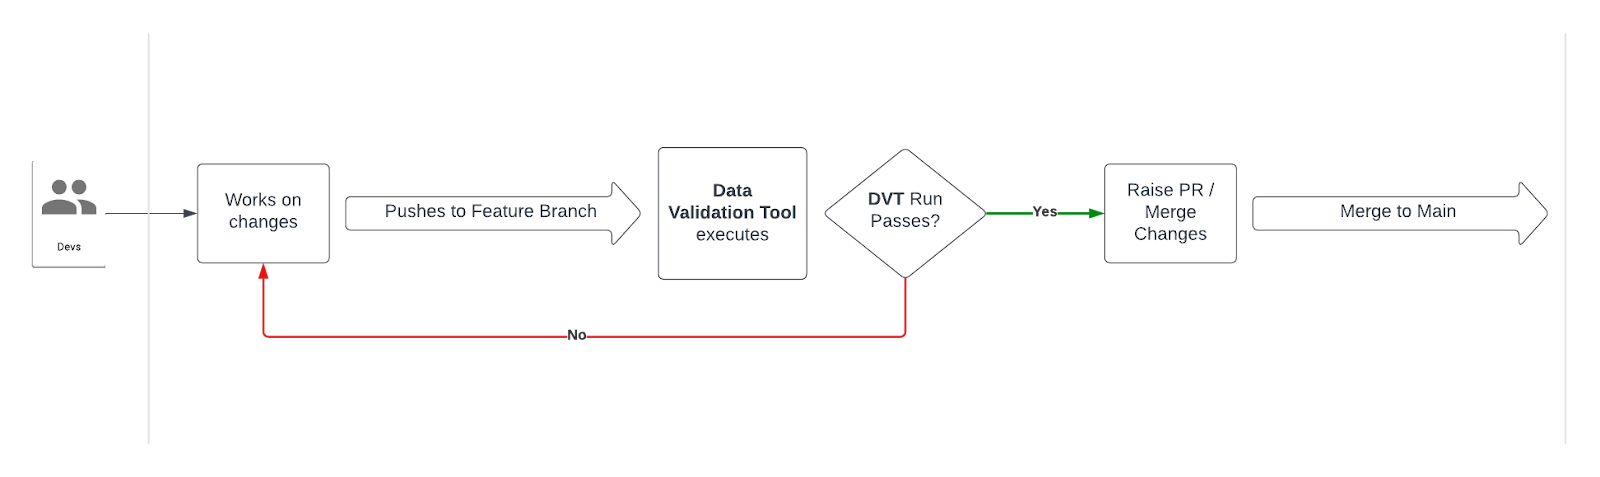
DVT GitHub Actions workflow
A developer needs to run a new data validation or update an existing one:
- Create a feature branch in your data validation GitHub repository
- Makes changes and pushes changes to a remote feature branch → Triggers DVT data validation GitHub Actions workflow:
- If the DVT GitHub Actions pipeline fails → Developer continues to work on changes and fixes
- If the DVT GitHub Actions pipeline passes → Developer creates a new PR to the Main branch
- Developer creates a PR to Main branch → Triggers DVT data validation workflow:
- If the DVT GitHub Actions pipeline run fails → Developer continues to work on changes and fixes
- If the DVT GitHub Actions pipeline run passes → PR is Approved and Merged to the Main branch
You can add a step to store the connections in a GCS bucket or locally. If you choose to store them locally, add a step to delete the config folder after the data validation step completes to ensure it doesn’t persist.
Result
Using DVT, we systematically uncovered and resolved all system discrepancies in an iterative manner. With each defect addressed, we reran validation tests to prevent regression, facilitated by seamless integration with the GitHub Actions pipeline. Each successful execution marked progress toward our project goals and eventual closure.
In the User Acceptance Testing environment, we identified issues, troubleshooted them, resolved them in a lower development environment, retested with DVT, promoted to higher environments, and repeated the process.
This rigorous approach instilled confidence in our ability to avoid regressions despite subsequent defect fixes, reassuring the customer that quality remained uncompromised throughout the project lifecycle.
Conclusion: choosing the optimal approach for DVT testing
The optimal DVT approach for your Snowflake-BigQuery integration will depend on several factors, such as the volume and complexity of your data, the frequency of data movement, and your budget. Consider these factors when making your decision:
- Data volume: For smaller datasets, direct table comparisons might be sufficient. However, for larger datasets, profiling tools or dedicated DVT tools might be more efficient.
- Data complexity: If your data is complex with intricate relationships and transformations, data quality rules or specialized DVT tools might be necessary to capture all potential discrepancies.
- Frequency of data movement: If data is frequently replicated or migrated between Snowflake and BigQuery, an automated DVT solution might be more efficient and cost-effective.
Data consistency between Snowflake and BigQuery is crucial for organizations relying on both platforms. Implementing a robust DVT strategy is essential for ensuring data quality, improving decision-making, and mitigating risks associated with inconsistent data. By carefully evaluating your needs and choosing the right DVT approach, you can build a bridge of trust between your Snowflake and BigQuery data, empowering your organization to confidently navigate the ever-evolving data landscape.
Additional tips
- For best results, integrate your DVT tests with the ETL/ELT pipelines to get recurring test results and early detection of discrepancies. DVT tests can be integrated with Cloud Composer, Cloud Functions, and Cloud Run.
- Consider creating multiple levels of DVT testing with varying levels of granularity depending on the use case. Integrate lightweight DVT tests with the data pipelines for cheap and quick validation of scoped data sets and time ranges to balance cost with efficiency. Integrate more detailed tests to cover wider ranges of data with a CI/CD pipeline that can be either manually or automatically triggered based on your use case.
- Document your DVT process clearly to ensure consistency and repeatability. Having a well-documented DVT test suite will help the team scale and replicate test cases systematically to reach conformity in testing approaches.
- Leveraging data governance practices to ensure data quality is a priority across the organization. DVT testing in its various ways of implementation will impact project timelines and will need to be accounted for to ensure successful completion of projects in a timely manner.
By following these tips and implementing a well-defined DVT strategy, you can effectively validate data between Snowflake and BigQuery, unlocking the full potential of your data-driven initiatives.
About Mina Botros
Mina Botros is a seasoned Senior Data Platform Engineer at SADA, An Insight company, boasting over a decade of experience in the IT industry, primarily focused on data engineering. Proficient in Python, Java, and Scala, Mina has extensive expertise in Google Cloud Dataflow and holds certifications including AWS Certified Solutions Architect — Associate (SAA), Databricks Certified Data Engineer Professional, Certified Secure Software Engineer Associate, and Google Cloud Professional Data Engineer. Additionally, Mina possesses a solid background in machine learning.
About Samuel Njoku
Samuel Njoku is a visionary manager, cloud expert, and AI enthusiast with a proven track record of leading high-performance distributed teams. He excels in delivering cutting-edge cloud solutions and managing large-scale infrastructure systems. Samuel is passionate about leveraging data and technology to drive innovation and growth. He is skilled in building and motivating teams, as well as providing mentorship and guidance. Samuel holds various certifications, including Professional Cloud Architect, Professional Cloud Security Engineer, Professional Cloud Database Engineer, and Professional Machine Learning Engineer. He is also an active member of the tech community and frequently speaks at industry events.
About Rahul Vangala
Rahul Vangala is a Senior Data Engineer at SADA, An Insight company, with over 10 years of experience in designing and implementing analytical warehouses and data platforms. With deep expertise in managing high-volume data and applying advanced tuning techniques for SQL and SPARK. He has primarily worked in the banking, healthcare, and digital marketing domains. He is skilled in Python, Scala, Java, Google Cloud Dataproc, Google Cloud Dataflow, Google Cloud Composer, and BigQuery, and holds a Google Cloud Professional Data Engineer certification.